The Mold tool allows you to not only pull a point but also pull the points surrounding it. The strength of the pull will be unevenly applied to the points: the further away from the main selected point, the weaker the force. It is as if you were modeling a clay model. This is a freeform tool. Modifications are done visually and cannot be specified numerically. |
|
|
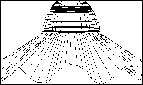
Example of use of the Mold tool | |
There are two ways to use the Mold tool:
· With interactive control of the area of influence
· With interactive control of the force of attraction
![]()
This tool uses the Dynamic Geometry properties.
For more information, see the chapter User Manual/ The Objects/ Dynamic Geometry.
![]()
The Mold tool works differently on a NURBS object. You will move points of the control box enclosing the object, in this way distorting the NURBS object.
q Modeling with interactive control of the area of influence
This method allows you to move points belonging to the area of influence according to the offset you apply to a single point. The further a point of the area of influence is from the main selected point, the smaller the offset applied to it. You can control the area of influence interactively.
1. Selecting the element to mold.
Using the Wand, click on the object you want to mold. It becomes the current object.
2. Selecting the Mold tool.
Click on the icon depicting the Mold tool in the Tools Palette.
A hand cursor is displayed.
3. Dynamic Geometry properties.
Depending on how you created the current object, you can work with its Dynamic Geometry properties. This means that you can work on one of the following four finishing levels:
1 – Rough structure
2 – Smoothed structure
3 – Rough object
4 – Smoothed object
In the “Dynamic Geometry” palette, click on the icon depicting the finishing level on which you want to work.
![]()
If you decide to work on your model at finishing level “n”, then you will no longer be able to work on levels “1” to “n-1” (the icon of the disabled levels will disappear).
![]()
For more information, see the chapter User Manual/ The Objects / Dynamic Geometry.
4. Selecting a point of the surface to pull.
Click on a point of the surface you want to mold.
5. Controlling the range of influence of the tool interactively.
Amapi 3D highlights in red the points of the surface of the object included in the range of influence of the tool. Only those points will be distorted by the action of the tool.
You can increase or decrease this range. Setting the range to its minimum size restricts the tool action to the point selected:
The adjustment of the range is done either through:
· The “+” or “-” keys of the numeric keypad.
· The “+” or “–” buttons of the Assistant Palette.
|
|
|
|
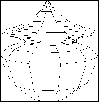
Bottle
|
Distorted bottle
|
Distorted bottle
|
You can modify the area of influence while you are moving the cursor (see step 4).
6. Deforming a surface with or without constraints.
The selected point follows the cursor movement and all the points included within the area of influence will be moved from their respective positions.
You can modify the area of influence while moving the cursor (see step 5).
You can apply motion constraints to the cursor.
For example, you can constrain the cursor to move along only one axis, as follows:
· By pressing the spacebar, which will toggle between the horizontal axis, the vertical axis or the plane.
· By clicking on one of the constraint setting icons in the Assistant Palette.
You can apply other constraints to the cursor movement.
· On an already existing point of the current shape or another one (Shift key)
· On a point of an edge
From lines of constraints (see the chapter User Manual/ Modeling help tools/ Assistant Palette/ Cursor displacement and moving constraints
7. Validating the distortion.
Click on the mouse button to validate the modeling.
Go back to step 3 to model another part of the object.
You can model another part of the object. To do this, go back to step 3 or 4.
Put the tool aside to end the action (depending on the interface). See chapter User Manual/Tools/Generic use of a tool/How do you end a tool action?
|
Practical exercises:
|
q Modeling with interactive control of the force of attraction
This option gives you, in addition to the control of the area of influence of the tool, control of the force of attraction of the tool. The further away a point (belonging to the area of influence) is from the main selected point, the weaker the force of attraction of the tool and the smaller the offset applied to the point. Therefore, points will be offset differently depending on their location within the area of influence of the tool, as if the surface was an actual clay model. You can define both the area of influence and the force of attraction.
1. Selecting the object to mold.
Using the Wand, click on the object you want to mold. It becomes the current object.
2. Selecting the Mold tool.
Click on the icon depicting the Mold tool in the Tools Palette.
A hand cursor is displayed.
3. Dynamic Geometry properties.
Depending on how you created the current object, you can work with its Dynamic Geometry properties. This means that you can work on one of the following four finishing levels:
1 – Rough structure
2 – Smoothed structure
3 – Rough object
4 – Smoothed object
In the “Dynamic Geometry” palette, click on the icon depicting the finishing level on which you want to work.
![]()
If you decide to work on your model at finishing level “n”, then you will no longer be able to work on levels “1” to “n-1” (the icon of the disabled levels will disappear).
![]()
For more information, see the chapter User Manual/ The Objects / Dynamic Geometry.
4. Switching to “modeling with interactive control of the force of attraction”.
To switch to the “modeling with interactive control of the force of attraction” mode, you can either:
· Click on the corresponding icon in the “Mode” area of the Assistant Palette.
Or
· Use the hotkey: Ctrl+spacebar.
A white circle indicating the area of influence of the tool is then displayed around the cursor.
5. Defining the area of action of the tool.
The surface of the circle indicates the area of action of the tool. You can modify it using:
· The “+” or “-” keys of the numeric keypad.
· The “+” or “–” buttons of the Assistant Palette.
6. Selecting a point to drag.
Click on a point of the surface you want to model.
7. Modeling with interactive control of the force of attraction.
The group of points belonging to the area of influence follows the movements of the point you selected. The further away a point is from the selected point, the weaker the force of attraction of the tool. You can modify the force of attraction of the tool using
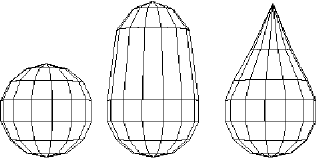
| ||
Original sphere |
Modeled sphere
|
Modeled sphere
|
· The “+” or “-” keys of the numeric keypad.
· The “+” or “–” buttons of the Assistant Palette.
You can modify the strength of the force of attraction as you are pulling the points (see above).
|
|
|
|
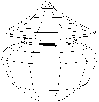
Bottle
|
Distorted bottle
|
Distorted bottle
|
8. Cursor movement and positioning constraints.
See chapter User Manual/Modeling help tools/Assistant Palette/Cursor movement and positioning constraints.
9. Validating the distortion.
Click the mouse button when you are satisfied with the distortion.
Go back to step 5 to model another part of the object if necessary.
You can model another part of the object. To do this, come back to step 6.
10. Ending the tool action
Put the tool aside to end the action (depending on the interface). See chapter User Manual/Tools/Generic use of a tool/How do you end a tool action?
![]()
The Mold tool is one of the tools which allows you to change the current object while using the tool.
To change the current object while within the tool:
· Press Shift+ESC or select the Wand in the Assistant Palette. The cursor switches to the Wand.
· Click on another object: it becomes the current object.